-
Flea market find!
Matt and I knew that when we bought a new house there were various items that would need to be upgraded. Our bedroom furniture is on that list. We are currently in possession of my childhood furniture set. However, this set did not come with bedside tables so a few years ago I bought some cheap side tables from Walmart. We couldn’t have anything too large in our old room at the townhouse. These fit nicely even though they were cheap.
Since we moved I’ve been randomly keeping my eye out for various pieces of furniture. Hence the dining room table sans chairs right now. 😉 About two weeks ago I was on FB on one of the buy, sell, trade sites I follow and someone posted a set of small chests for $120.00. I commented for dimensions and said I would be interested if the first deal fell through. The next day I received a PM from the lady. The chests were available, and they were just about the right size! I im’ed Matt and he said “whatever”! I PM’ed the lady back, asked if she would take $100.00 for the pair and the next day I went to pick them up. They weren’t in perfect condition but they were in good condition. I just needed to decide on a paint color and I was in business.
For a while now, I’d been looking at new chests. The only problem was that most of the new chests were 1) more than I wanted to spend and 2) too tall. Our bed is pretty low so we needed chests that were under 30″ tall. Most new chests are several inches over 30 which I knew Matt would complain about. The used chests came in right at 28″ tall which makes them only a few inches taller than the bed and not uncomfortable while reaching up from the bed.
The weekend I got the chests, Matt and I ran to Lowes to look at paint colors. I ended up choosing Morning Fog by Sherwin Williams. It’s a really pretty light greyish blue color. I was a little worried there wouldn’t be enough contrast between that and the wall color but decided to just go with it. First I primed the chests and drawers with Kilz. Then over the next few days I painted the chests, and then the drawers. Within a week I had everything done. (Which was kind of shocking!) Originally I had planned to use the pulls that were on the chest and just spray paint them but then I realized almost all of them were pulling apart and Matt didn’t really think he could fix them. I searched on Amazon and fell in love with some antique looking glass knobs but they were $17.00 for a set of 4. I would need 12 and I wasn’t sure I really wanted to spend $50.00 on knobs. In the end, that’s exactly what I ended up doing. The chests were really cheap so I figured I could splurge a little on knobs.
For just over $150.00, I was able to get us new bedside tables and they turned out AMAZING! The knobs really add a little something and the color blends nicely with the room. Seeing how well these turned out, kind of makes me what to buy the Hurdal dresser and chest from IKEA, paint them and add the same knobs. (Side note, we saw these at IKEA and they are quite large and sturdy which is the only reason I’m really considering them.) That would redo our whole bedroom (chests included) for under $1000.00. I told Matt I’m not really ready to take on this project but it might happen soonish. 😉
Before: Our small crappy little tables. 
The chests before, during, my knobs, and after. -
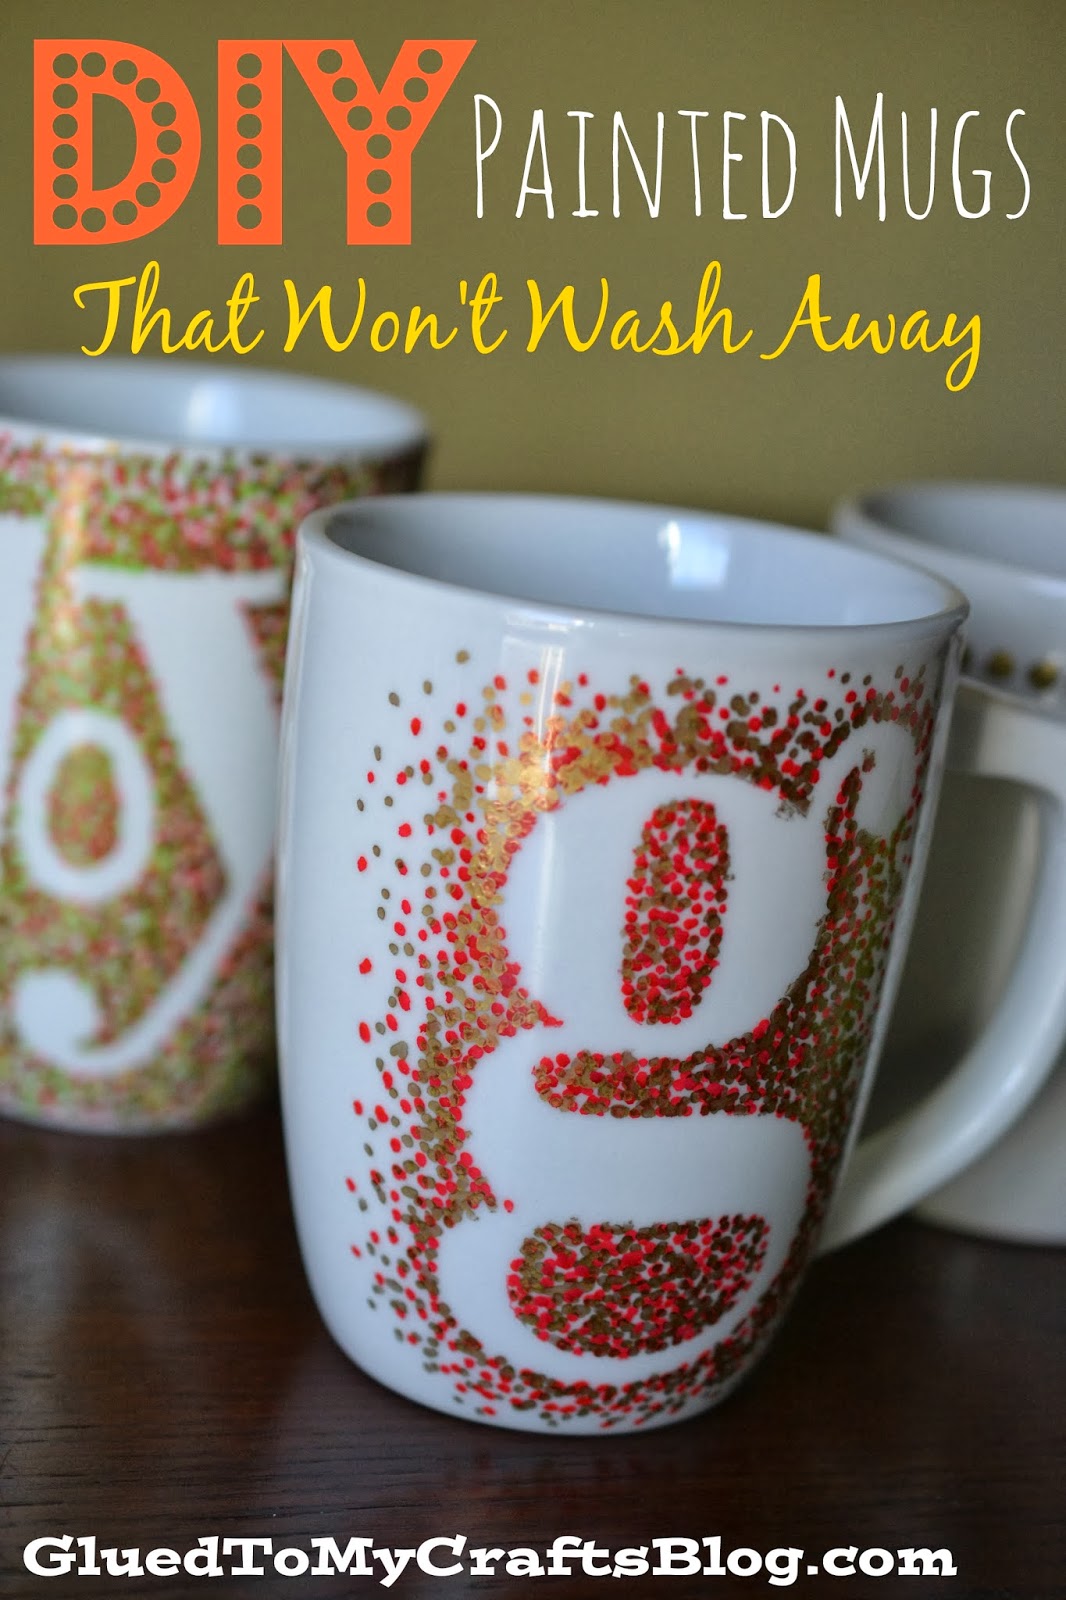
Mr. Picky Pants
Matt and I have been on a coffee kick lately on weekend mornings. We have about 3 mugs that hold 10+ oz and fit under the Kuerig so we decided we needed some bigger mugs. When Matt first mentioned this, I told him I’d run to Home Goods or TJ Maxx and pick up a few new ones. Well work has been crazy or it’s been cold and rainy so I haven’t run out at lunch to look.
Yesterday the weather was nice and we needed to run to the grocery store. Matt asked if I wanted to grab lunch first so I said yes. We headed to Briar Creek to Panera. I told him we could run to Home Goods and TJ Maxx to get new mugs after we ate. We get to TJ Maxx and I find a little wall of fun mugs and tell Matt to pick some out. He is like “ummm I want a set.” Ohhhhh! Well okay then. That is news to me. We walk over to Home Goods because I figure they will have some sort of set. We find some cute white ones but he doesn’t like these either. Once we’ve completed our lap around the store I suggest we walk down to Pier 1. Surely they will have something he likes.
Pier 1 had a much better selection and the prices weren’t much more than what we found at Home Goods. We finally agreed on, wait for it……..plain white mugs! Honestly this works for me. I’ve had visions of fun “fancy” mugs for a while and the white will let me do this. I know there are paints and pens for ceramic that you can use and then bake into the mug.
Here are a few ideas I am currently loving.
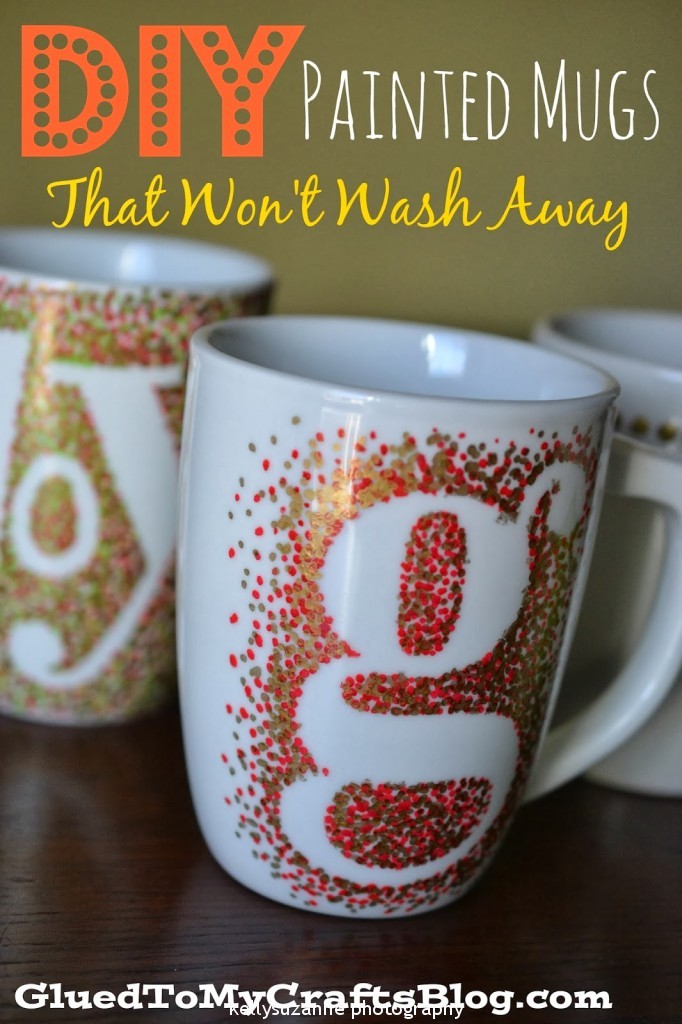


I feel like either polka dots or the half painted ones will win out. Of course they will all be gold. I like the simple designs the best but there are tons of ideas if you image search diy mugs. I’ll post pics once I add the finishing touches to ours!
~k
-
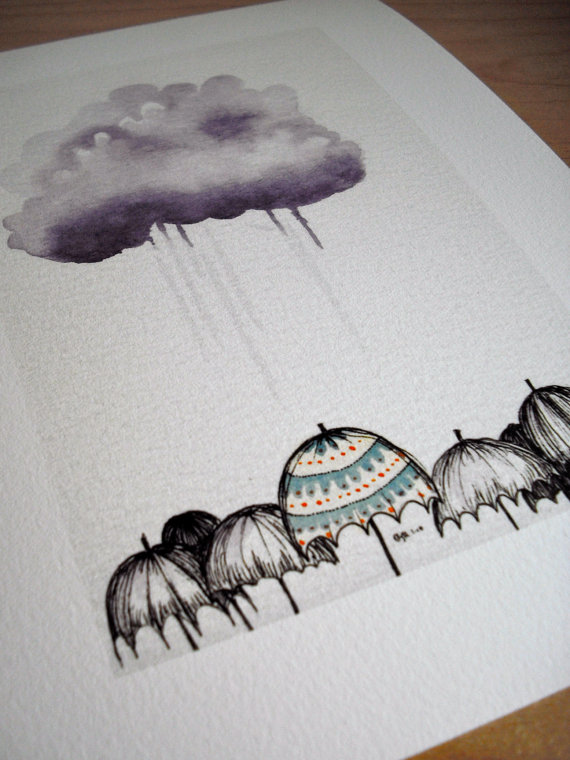
I feel another Pinterest Project coming on…
It’s been several months since I have been inspired to create any of the craft projects I currently have pinned. I found this adorable pic from Esty dealer drawGabbydraw and just knew I had to do it. I have watercolors so all I really need it probably a good pen. I have no idea where I will put it. I might need my own little lady cave so I can display all my random art projects. 😉 I still have my NC heart lying around somewhere.
In other news, I think Matt and I have finally decided on a location for our trip. More details soon. 🙂~k
-
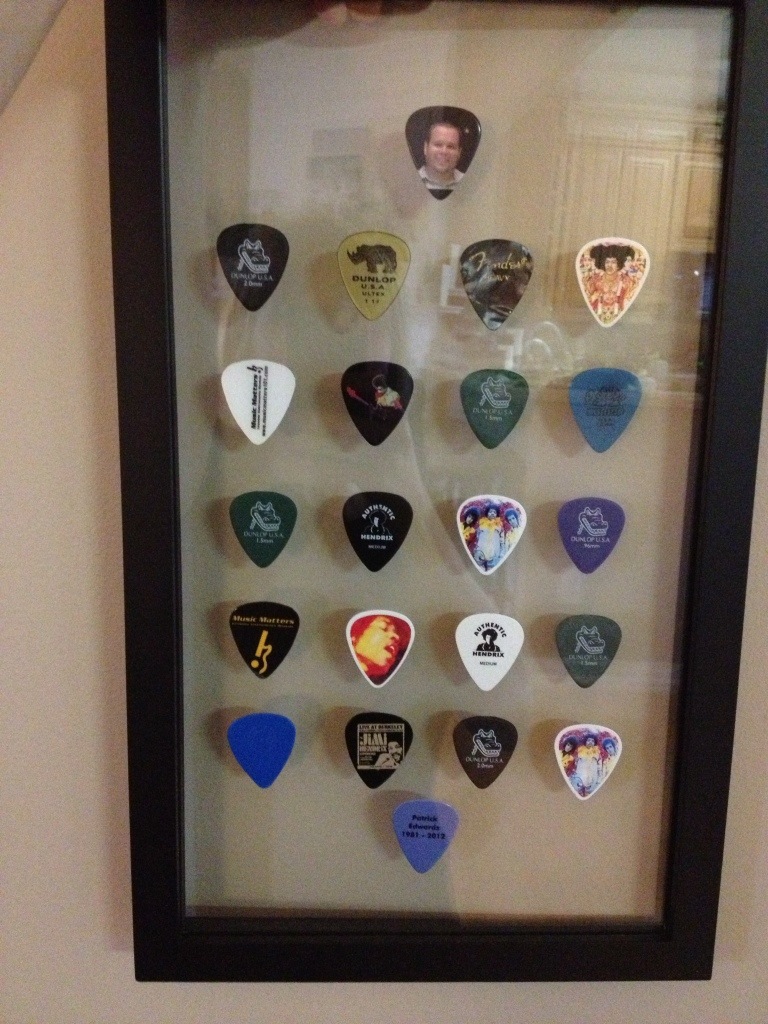
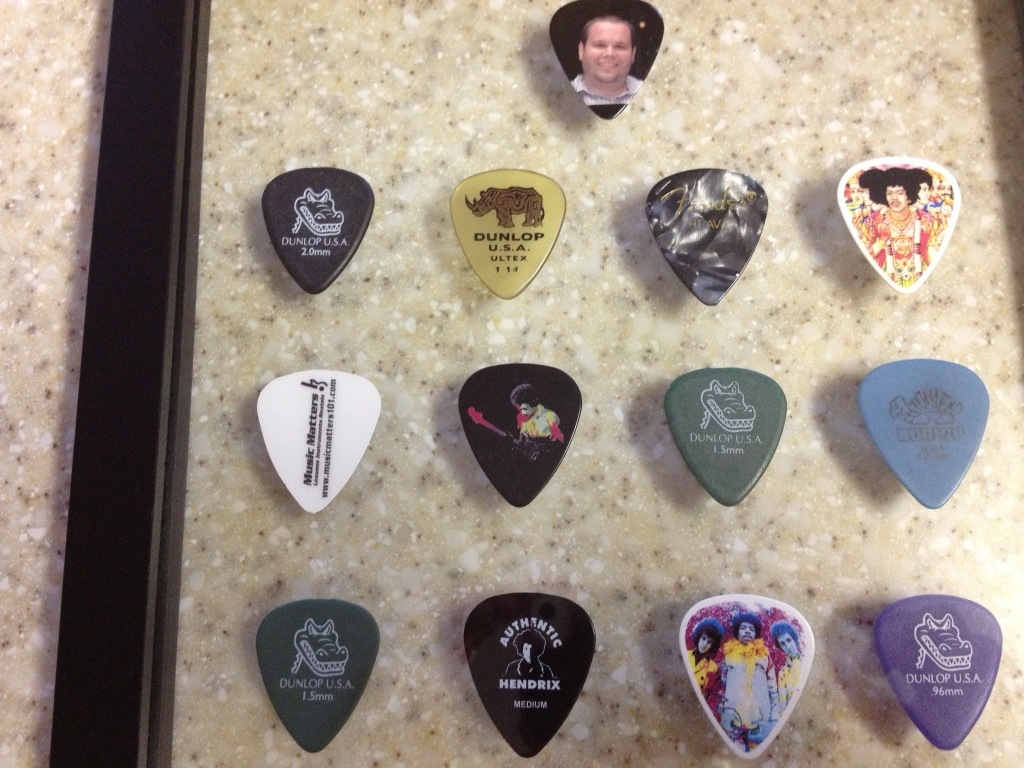
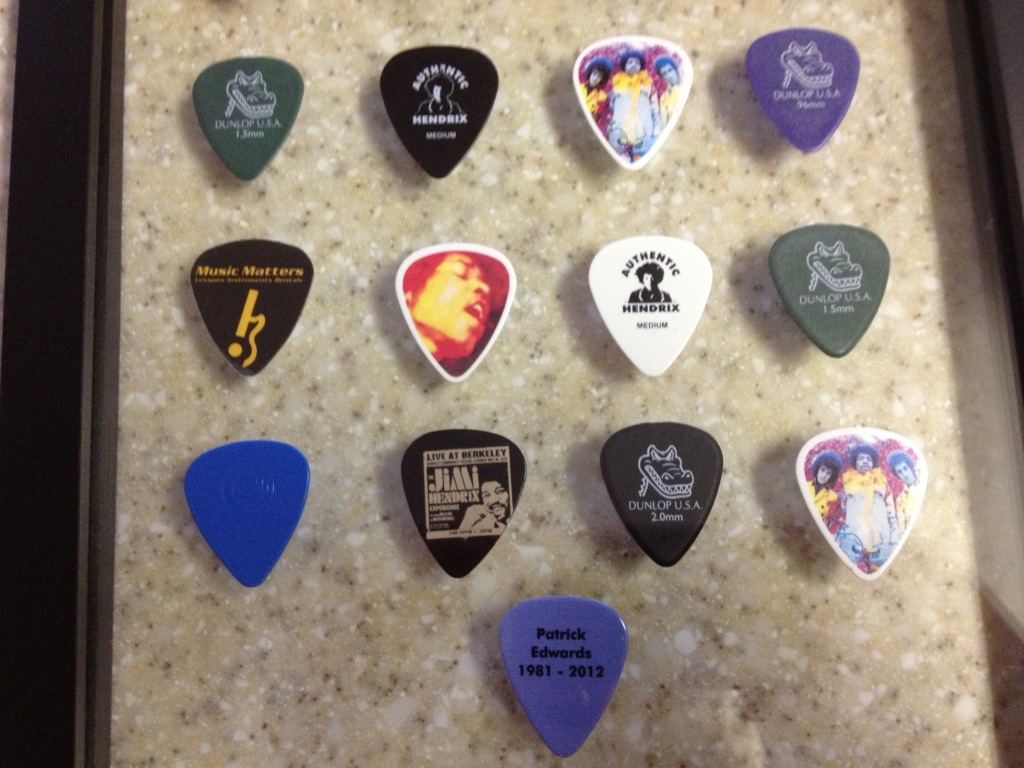
A special craft
I don’t think I mentioned it, but my brother in law Patrick, was very big in the music scene. He played the guitar, managed a music store and was constantly going to festivals to help.
As we were cleaning his house, we started finding guitar picks laying around. I guess I didn’t really think about the fact that he probably had a ton of them until we had a little baggie full. As soon as I saw how many there were I knew what I wanted to do! I asked Jill and Steve if I could have them for a project I had in mind. Of course they said yes, so for the past 2 months they’ve been sitting in the closet waiting on me.
On Sunday Matt and I ran to Michael’s to find the items I needed. A glass back frame and some glue. I ended up buying 2 frames because I wasn’t sure what exactly I wanted to do. One idea involved some sheet music. The other just needed a frame. Plus they were different sizes, one was square and one was rectangular, and I wasn’t sure which size would work best. In the end I used the rectangular one.
So what did I do? I glued the guitar pics to the to glass. It wasn’t hard or too time consuming, though it did take a little while to figure out which ones I wanted where. I knew I wanted to use the memorial ones at the top and bottom and I just filled in from there.
-
More baby gifts
A friend is pregnant and since I was literally the first to know I thought I would do something a little special for her shower gift. Of course I knew I wanted to make a blanket for baby k but there was also a sign I wanted to include. I knew baby k’s mom had been eyeing one on etsy that I knew I could recreate.
A few weeks ago I started working on my projects. I started looking for fabric and found a few online. I ran to Joann’s at lunch one day and happened to find some cute flannel that was also on sale. I grabbed that and some minky and I had what I needed for project 1.
My next hurdle was the sign. I needed wood, but it couldn’t be too heavy or shipping would kill me. Then I needed a starfish. Thankfully Matt’s mom was able to find the last 2 at a store near her. The last time they came up she brought the starfish. Neither were prefect but one had a little more personality. When turned the right way it looked its little leg was kicked up dancing.
I got my ass in gear and started working on my gifts. I mean baby k could be here any day. Thankfully the gifts arrived in tact today!
So here’s what I made.
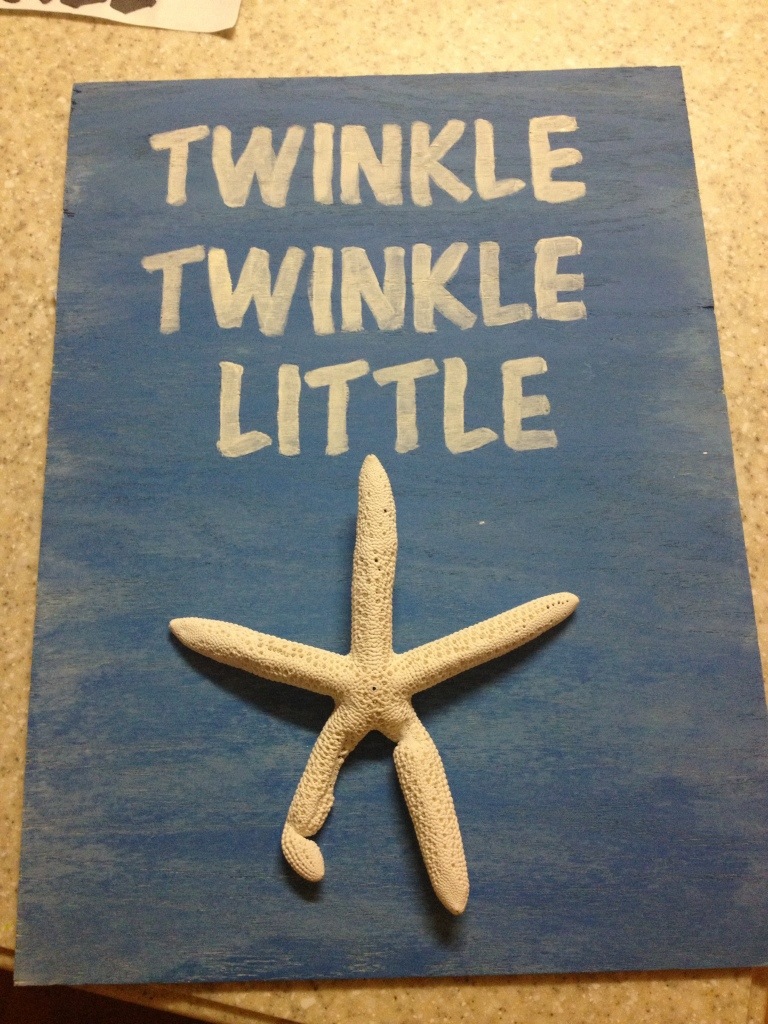
I’ll do a walk through of the sign later in the week.
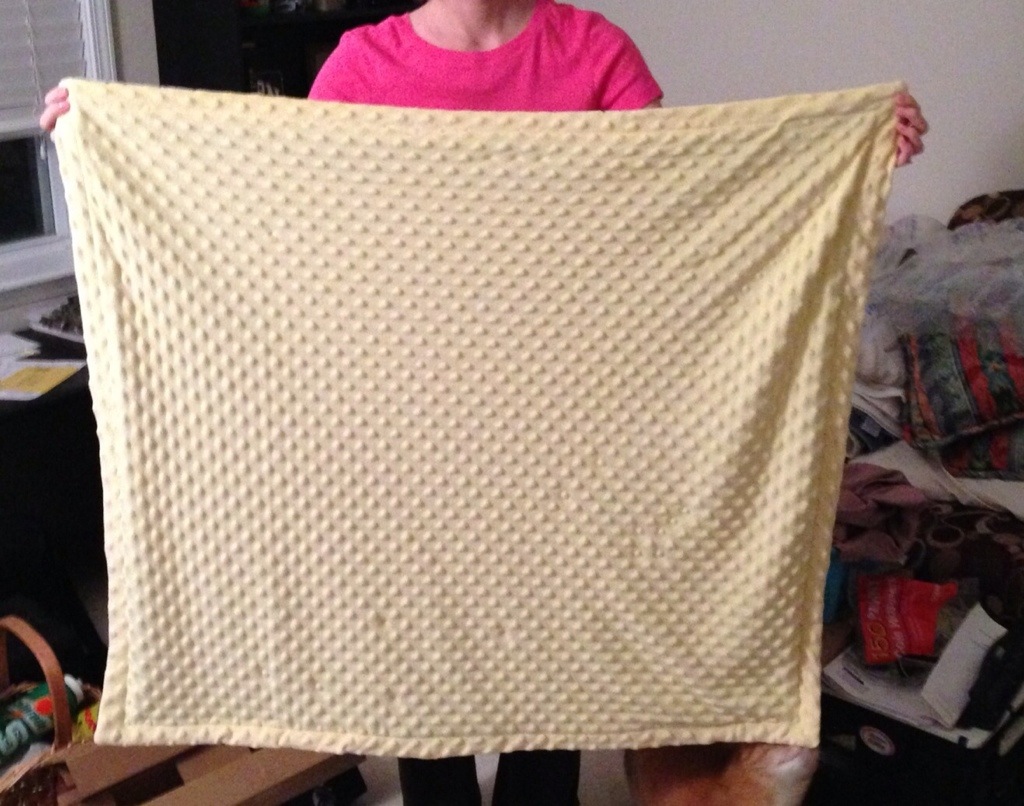
I am pretty happy with both projects and baby k’s mom seems to like them too. 😀
~k
-
DYI Face Scrub
I found this on Pinterest last night. A DIY scrub that would make your face feel amazing. Since it only required 3 ingredients, all of which I had, I decided to try it out. Let me just say I was a little skeptical at first. I’ve been known to try the occasional random dyi on my skin and most of the time I only feel lack luster about the results, but not this one. No sirree bob. When I was finished my skin felt as smooth as a baby’s bottom. No joke!
The recipe I found online called for tablespoons but I thought that seemed like a lot so I used teaspoons instead. Here you go:
1/2 teaspoon sugar (white sugar)
1/2 teaspoon baking soda
1 teaspoon of water
Obviously you could use more if needed, just double the recipe. At first I thought this was too much water but you need the water. I ended up adding a little more water to my hands and adding it to my face. It’s a little grainy so I wouldn’t rub too hard but you want to make sure you get it on good. Once I covered my face, avoiding my eyes, I let it sit for just a minute. I don’t think this is something you really want to leave on for 5 -10+ minutes. Next rinse. I immediately could feel the difference on my skin. It was so soft I was almost in shock. I couldn’t tell you the last time my face felt like that. I will say it was a little red for about a minute but the redness quickly went away.
I am definitely adding this to my skin care routine as a weekly thing. Honestly this scrub made my skin much softer than my Olay brush. I’m still using my Olay brush a few times a week but I don’t see the results I thought I would, I might be a smidge disappointed. I find the bristles are kind of rough. I think this might actually be better for my back and chest but I haven’t made the switch at this point. I am kind of in the process of changing my skin care routine so we’ll see how that turns out.
I also wanted to add that a few months ago I mentioned I was taking Cod Liver Oil. Well over the holidays I stopped taking them because life was so crazy. We hadn’t been home much and worrying about vitamins was really last on my list of things to do. Then one day at work I noticed my skin looked kind of dull and lifeless again. Hmmm. The Cod Liver Oil really was making a difference. Much more than I realized at first. Of course I have now added it back to my daily routine and I’ve found my skin is already started to look glowier and dewier. Add this to your skin care routine! So quick and easy, and it totally works!
~k
-
From drab to FAB!
I mentioned that Matt and I went to Southpoint on Saturday. After lunch we headed towards the mall part, it’s kind of an indoor outdoor mall, but I wanted to stop by Anthropolgie on the way in. It’s super pricey and I never even look at the clothes but I do like to look at the random housewares. As I was browsing I noticed 2 big shelves full of knobs. Oh heck yeah! There’s a desk in our foyer I’ve been planning to refinish but I wanted to find new knobs.
Anyway I probably stood there looking at all the knobs for about 10 minutes. I asked Matt about a couple but he wasn’t very helpful. Then he noticed there were a few buckets of clearance knobs. These knobs were all 3.00 a piece instead of 8.00 – 10.00 for the regular ones. Don’t get me wrong 8-10 bucks a knob isn’t bad but for 3.00 a piece I could get 4 knobs for the price of two and don’tcha know that’s exactly what I did. 🙂 I found 2 sets I really liked but I couldn’t choose so I bought both.

Thankfully I am a procrastinator and I didn’t want to paint my desk last weekend because it was too hot. Well this weekend was amazing and a bit cooler so Sunday morning
afternoonI started working on the desk. First I sanded the top and sides with my mouse sander. Then I grabbed some course grit sand paper and began working on the legs. Legs are such a pain when they are spindley. Since I was going to paint the desk I knew I didn’t have to do a great job with the sanding. I just needed to knock the varnish off.I spent about 45 minutes sanding down my desk before I decided it was good. I picked out a bright blue paint so I wanted to make the piece look distressed and old. As I started painting on the top I found if I did a light enough coat I could almost dry brush the paint on. This was kind of giving me the effect I wanted so I continued. As the paint dried I touched up a few spots here and there but over all I think it turned out pretty good and I didn’t have to use any sandpaper to the finished paint job. 🙂
Before:


After:


~k -
What else should you do
with a doll head? I mean the dollar store had tons of random doll heads the other day so my coworker suggested we get one and put it on another coworker’s desk. Of course my inner Martha came out and that just wouldn’t do. I mean everyone needs a doll head snow globe right? 😀
I can’t decide if I’m just crafty or a little demented. Maybe it’s my inner Dexter. HA!
Happy Friday!
~k

-
I make art!
I think I mentioned a few days ago that I was in the process of trying to find something to put over our bed. I’d looked at a few fabric stores but I couldn’t find anything I really liked. Today during lunch I decided to run to Michael’s. I figured if nothing else I could go ahead and find some frames. Boy was I in luck because all their frames were 40-50% off. SCORE! I managed to find 4 frames I really liked and with the discount they would be about $15.00 each and I needed 4.

Above is my inspiration pic but at $88.00 each buying 4 would have been silly. Obviously this pic is pretty awesome but I just couldn’t justify that kind of price. I knew I should be able to do something similar for a lot less. I just needed to find it.
While I was at Michael’s I started browsing the scrapbook section. They have TONS of paper and I figured there had to be something I thought might work. After looking for a while I finally came across a book of paper. Out of the 180 sheets I found a few pieces I thought would work. There was only one real problem, they only had 3 of each page. GRRR! This would mean one of two things, either I used 2 different prints or I would have to use 4 different prints. I wasn’t sure how I would feel about either of these options. On top of that the book itself was $12.00. Not a bad price really for all that paper but I don’t scrapbook so I would probably have a book of paper sitting around for a while. I decided to check out the individual pieces of paper. A few minutes of looking and I found something I really liked. It had all the right colors and for a $0.50 a piece I was sold.
I’m pretty proud of my DIY artwork and for $66.00 and change it is a great deal.

Sorry for the craptastic pic. It was a quick cell pic.

As you can see I was trying to decide between matted and plain. In the end Matt’s choice of matted won out. I think once we get the walls painted they will really pop.
I will post more pics once we get them hung this weekend.
~k
-
I just need fabric!
Last weekend Matt and I ended up going over to Triangle Town Center mall. There’s not a whole lot there but they have this really awesome store called ZGallerie. I love to go in this store and look around. I would love to buy some of there stuff but it’s a little pricey and I’m not sure how Matt would feel coming home to some of the items they have. Of course I think it is all fantastic. 🙂
Anyway, while we were there looking through the art work I found a couple of neat prints. They gave me an idea. Since they didn’t match our bedroom and well they were $90.00 each, which isn’t that bad, I’ve now decided to make something similar. I just need to find something with a pattern I like and colors that match our room and then I can frame them. My first thought was fabric and over the weekend we were by a fabric store so I made Matt run in. I found a really cool print in a sample pack but they were out of the bolt. Booo! There is another fabric store closer to work so I decided to run there during lunch today. I looked and looked and they had a lot of fabric but nothing I really thought would work. Plus there was a really long line at the cutting station.
Since I seemed to be out of luck in the fabric department it hit me that I might could find some cool napkins that would work. This would also keep me from having to deal with figuring out the repeat of a pattern and measuring. Because I pretty much suck at measuring. 🙂 There was a World Market next to the fabric store so I headed next door. I looked at everything from gift wrap to bags to pillows as I made my way around the store. When I finally got to the kitchen and dining section I realized they didn’t have anything either. They had some cute stuff but nothing that would match our bedroom. All in all it was pretty unproductive.
Now I am on the search for something with a cool pattern that will do with the blue and brown I have in the bedroom. Hopefully I will find something soon. If and when I do I’ll post some pics.
~k